How to Connect Hikvision Cameras via PoE Switch to NVR (Network Setup Guide)
How to Connect IP Cameras via a PoE Switch and Still Record on an NVR
This is a very common setup when installing CCTV systems. Many people run out of PoE ports on their NVR or want to install cameras further away, so they connect cameras to a PoE switch instead. The cameras can still record on the NVR, but they must be configured correctly on the network.
This guide explains exactly how to do it.
Network Layout (Very Important)
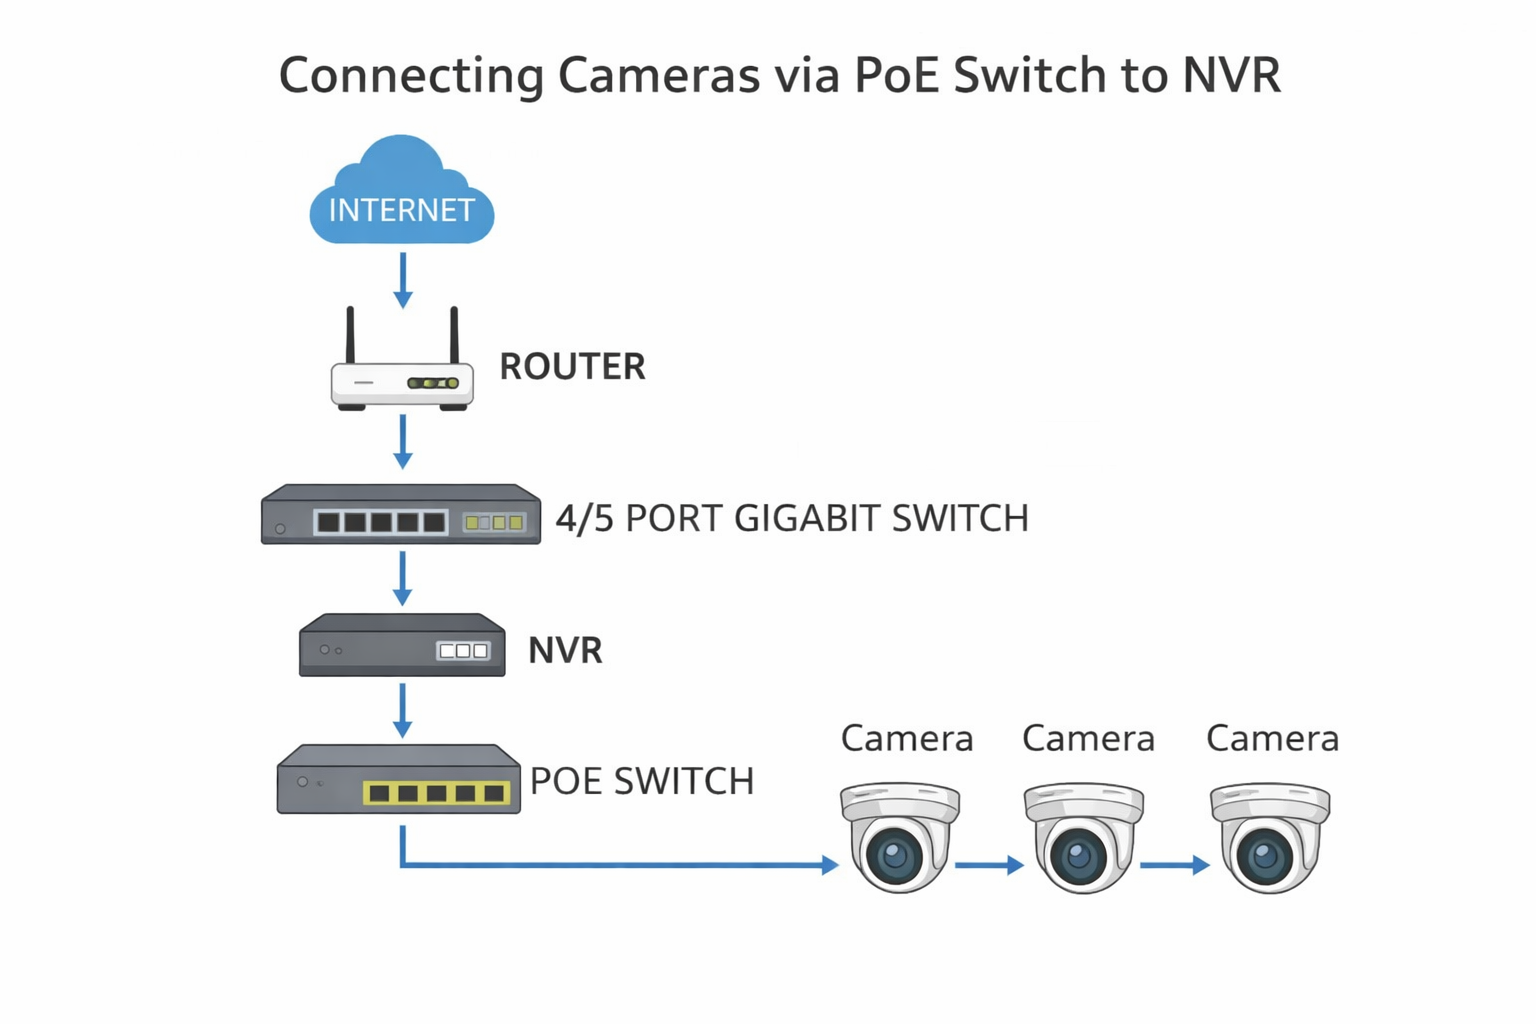
Your system should be connected like this:
      Router
             │
      Network Switch
        │         │
       NVR     PoE Switch
                    │
                    ├── Camera 1
                    ├── Camera 2
                    └── Camera 3
Important: The router, NVR and PoE switch must all be on the same network.
The router connects to the network switch, the NVR connects to the network switch, and the PoE switch also connects to the network switch. The cameras then connect to the PoE switch.
The NVR will then detect and record the cameras over the network.
Step 1 – Download SADP Tool
Download Hikvision SADP Tool here:
https://www.hikvision.com/uk/support/tools/hitools/
Install and open SADP on a computer that is connected to the same router, either wired or via WiFi.
SADP will show all Hikvision devices on the network, including the NVR and any cameras connected via the PoE switch.
Step 2 – Set the Camera IP Address
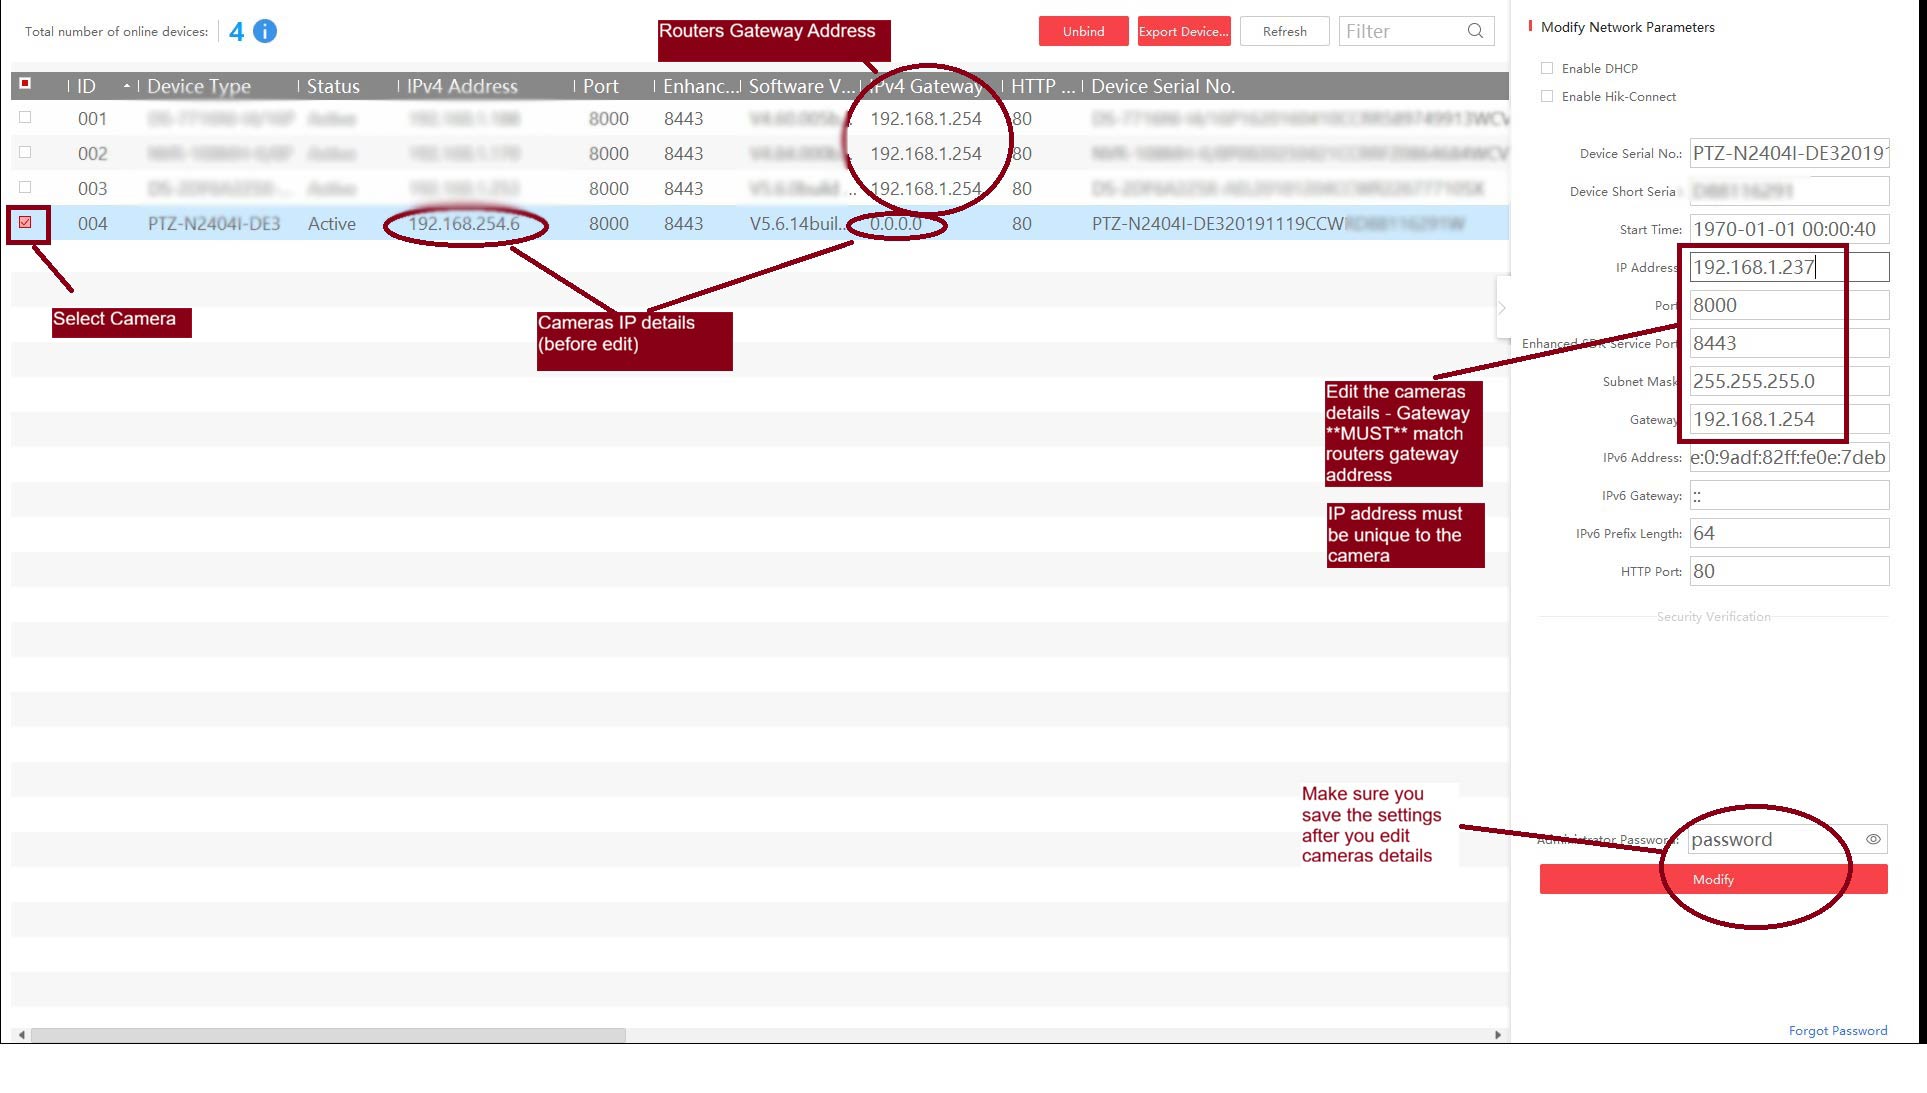
SADP Tool showing cameras on the network. Make sure the camera IP address, subnet mask and gateway match your network before adding the camera to the NVR.
When cameras are connected via a PoE switch, they must be given an IP address that matches your local network.
You need to edit the camera network settings in SADP and set:
- IP Address
- Subnet Mask
- Gateway
Example Network
Router IP (Gateway): 192.168.1.254
NVR IP:              192.168.1.188
Camera 1 IP:         192.168.1.237
Camera 2 IP:         192.168.1.238
Camera 3 IP:         192.168.1.239
Subnet Mask:         255.255.255.0
Important Rules
- The Gateway must match the router gateway
- The first three parts of the IP must match the gateway – for example: 192.168.1.xxx
- The last number must be unique for each device
- No two devices can have the same IP address
After changing the IP address, open a web browser and go to the camera IP address:
http://192.168.1.237
If the camera login page appears, the camera is set up correctly on the network.
Pro Tip: How to Find a “Clear” IP Address
Before assigning an IP address to a camera, make sure no other device, such as a printer, laptop, or phone, is already using that address.
On a Windows PC:
- Press the Windows Key
- Type cmd and press Enter
- In the command window, type:
ping 192.168.1.237
(Replace the number with the IP address you want to use)
- Press Enter
If it says:
Request timed out
The address is safe to use.
If it says:
Reply from 192.168.1.237
The address is already in use, so pick a different number and try again.
This is the easiest way to avoid IP address conflicts on your network.
Step 3 – Add the Camera to the NVR
Now the camera must be added manually to the NVR.
On the NVR go to:
Menu > Configure > Camera
Select an unused channel and click Edit, then change the following settings:
- Mode: Manual
- IP Address: camera IP address
- Protocol: Hikvision
- Management Port: 8000
- Channel Port: 1
- Transfer Protocol: Auto
- Username: admin
- Password: camera password
- Tick Use camera activation password
Click OK.
After around 30-60 seconds the camera should come online and start recording.
Repeat this process for any other cameras connected to the PoE switch.
Common Problems
Camera shows 0.0.0.0 Gateway
This means the camera does not know where the router is.
You must manually enter the correct gateway, usually 192.168.1.254.
IP Address Conflict
If two devices have the same IP address, cameras will drop offline or not connect.
Make sure every device has a unique IP.
Camera works in browser but not on NVR
This usually means:
- Wrong password
- Wrong port – it should normally be 8000
- Camera still set to Manual instead of Plug & Play
Summary
To connect cameras via a PoE switch and still record on the NVR:
- Connect Router, NVR and PoE Switch to the Gigabit switch
- Use SADP to give each camera a valid IP address
- Make sure Gateway matches the router
- Make sure each camera IP is unique
- Add cameras to the NVR manually
- Wait 60 seconds for cameras to come online
Once set up correctly, this works exactly the same as plugging cameras directly into the NVR.